
Before getting started you need to know the basic properties of UIView. These properties are going to play a major role in animations
1. center (center point of view)
2. frame (position of rectangle in the super view's coordinate, size, stretching, etc)
3. bounds (rectangle in its own coordinate system, size, stretching)
4. alpha (transparency)
5. transform (rotation, scaling, basically any changes to the UIView)
We can make a UIView animation using below functions.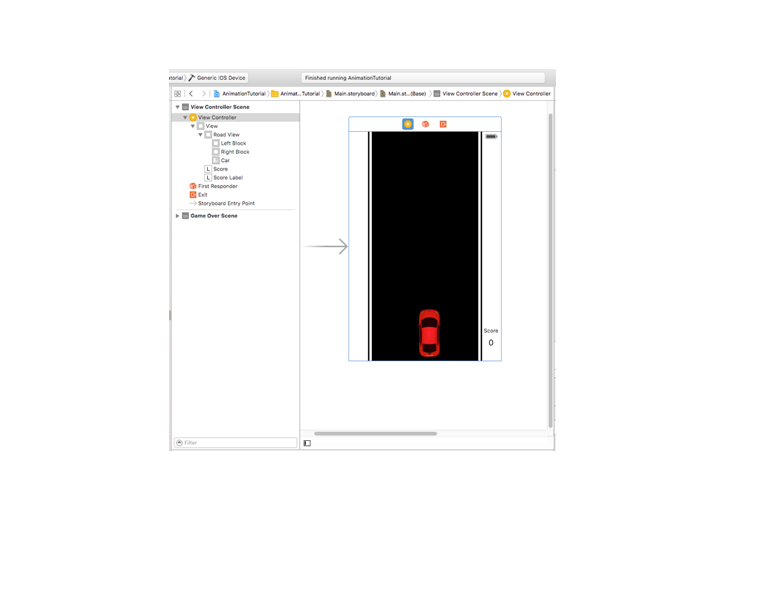 Accelerate the Car
We are going to move the car towards all the four directions by using device acceleration. To get the device acceleration you need to create an object reference for CMMotionManager. CMMotionManager has a property accelerometerUpdateInterval to update the accelerate status.
And you can add your callback block coding after acceleration get updates by using the method startAccelerometerUpdatesToQueue. This method has a handler with input parameters CMAccelerometerData and NSError
Accelerate the Car
We are going to move the car towards all the four directions by using device acceleration. To get the device acceleration you need to create an object reference for CMMotionManager. CMMotionManager has a property accelerometerUpdateInterval to update the accelerate status.
And you can add your callback block coding after acceleration get updates by using the method startAccelerometerUpdatesToQueue. This method has a handler with input parameters CMAccelerometerData and NSError 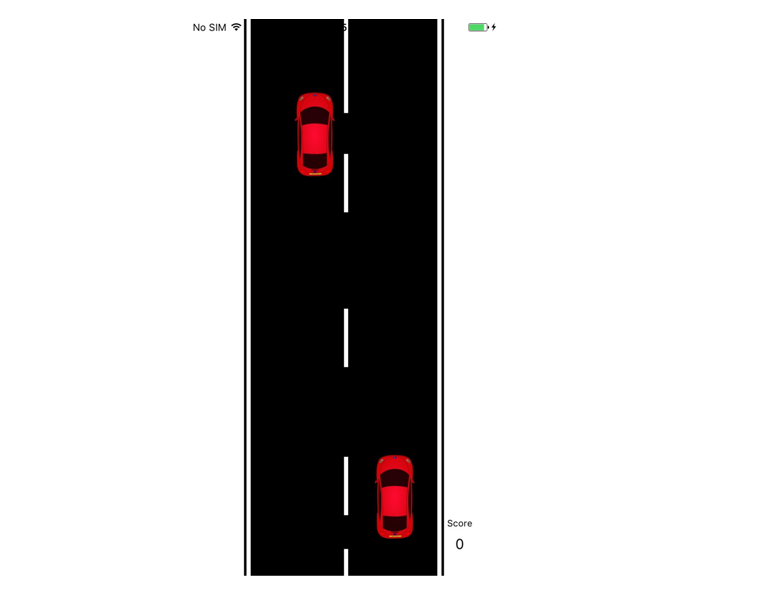 Create and animate opposite cars
Now you almost have a moving car on road. We can add some more interesting things by making it like real driving by adding some more cars which will move on the opposite direction. In viewDidLoad function I created one more NSTimer to create opposite cars. This will call the createcars function for every 2 seconds and move it with random speed.
Create and animate opposite cars
Now you almost have a moving car on road. We can add some more interesting things by making it like real driving by adding some more cars which will move on the opposite direction. In viewDidLoad function I created one more NSTimer to create opposite cars. This will call the createcars function for every 2 seconds and move it with random speed.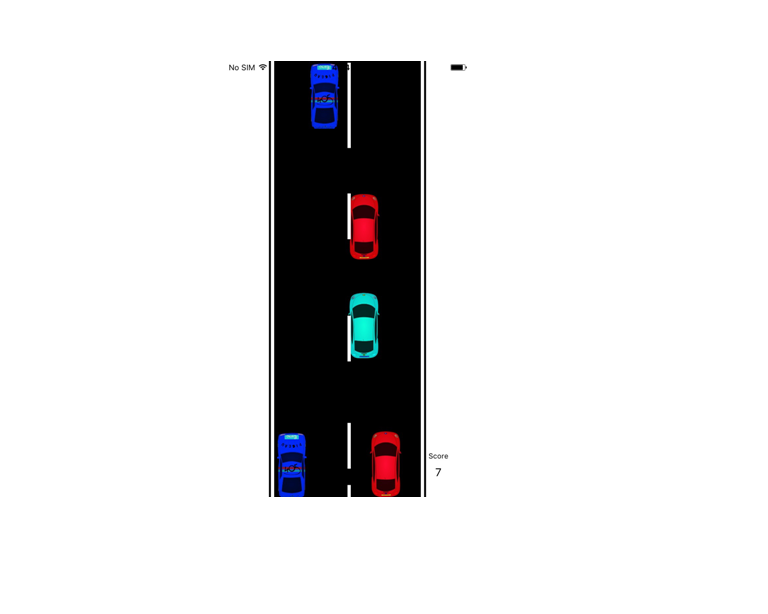
[UIView animateWithDuration:.5f animations:^{
}];
[UIView animateWithDuration:.5f animations:^{
} completion:^(BOOL finished) {
}];
[UIView animateWithDuration:.5 delay:.5 options:0 animations:^{
} completion:^(BOOL finished) {
}];
[UIView animateWithDuration:.5 delay:.5 usingSpringWithDamping:.5 initialSpringVelocity:20 options:0 animations:^{
} completion:^(BOOL finished) {
}];
Let’s begin our game....!!!! We will go with overview first.
1. Design a play ground
2. Accelerate the car
3. Create and animate the divider lines
4. Create and animate the Opposite Car
5. Detect accident
Design a play ground
1. Create a new project with the type of Single View Application
2. And design a play ground environment like the below image with the objects- Road
- Road blocks (left, right)
- Car
@property (weak, nonatomic) IBOutlet UIImageView *car;
@property (weak, nonatomic) IBOutlet UIView *roadView;
@property (weak, nonatomic) IBOutlet UILabel *scoreLabel;
 Accelerate the Car
We are going to move the car towards all the four directions by using device acceleration. To get the device acceleration you need to create an object reference for CMMotionManager. CMMotionManager has a property accelerometerUpdateInterval to update the accelerate status.
And you can add your callback block coding after acceleration get updates by using the method startAccelerometerUpdatesToQueue. This method has a handler with input parameters CMAccelerometerData and NSError
Accelerate the Car
We are going to move the car towards all the four directions by using device acceleration. To get the device acceleration you need to create an object reference for CMMotionManager. CMMotionManager has a property accelerometerUpdateInterval to update the accelerate status.
And you can add your callback block coding after acceleration get updates by using the method startAccelerometerUpdatesToQueue. This method has a handler with input parameters CMAccelerometerData and NSError
@interface ViewController (){
CMMotionManager *mManager;
NSMutableArray *cars;
int score;
}
- (void)viewDidLoad {
[super viewDidLoad];
cars = [[NSMutableArray alloc] init];
[self detectAcceleration];
[NSTimer scheduledTimerWithTimeInterval:.5
target:self
selector:@selector(createDivider)
userInfo:nil
repeats:YES];
[NSTimer scheduledTimerWithTimeInterval:2
target:self
selector:@selector(createCars)
userInfo:nil
repeats:YES];
}
//Get acceleration status
- (void)detectAcceleration{
[mManager setAccelerometerUpdateInterval:0.01];
[mManager startAccelerometerUpdatesToQueue:[NSOperationQueue mainQueue] withHandler:^(CMAccelerometerData *accelerometerData, NSError *error) {
//Move Car
[self moveCar:accelerometerData];
}];
}
The CMAccelerometerData contains the acceleration on x, y, z points. When you code the below lines your CAR will react for the Device Motion. You can go forward, backward, left, and right.
//Move car based on user accelerometer
- (void)moveCar:(CMAccelerometerData *)accelerometerData{
UIImageView * __weak weakCar = _car;
[UIView animateWithDuration:.3
delay:0.0
options:0 animations:^{
CGRect oldRect = weakCar.frame;
float divertion = accelerometerData.acceleration.x;
if (divertion > 0.09 || divertion < -0.09) divertion *= 10; float speed = accelerometerData.acceleration.y; if (speed > 0.09 || speed < -0.09)
speed = speed * -accelerometerData.acceleration.z * 20;
CGRect newLocation = CGRectMake(oldRect.origin.x + divertion, oldRect.origin.y - speed, oldRect.size.width, oldRect.size.height);
if (CGRectContainsRect(_roadView.frame, newLocation)) {
weakCar.frame = newLocation;
}
}
completion:^(BOOL finished) {
//Completion Block
}];
}
Creating and Moving dividers
The next step is to create a divider line and get it moving. If you noticed in the viewDidLoadFunction, I have created NSTimer to create dividers. This will call the below function for every 0.5 seconds and make it animate. This will let us feel like the car is moving.
//Move dividers at center of the road
- (void)createDivider{
//Create a view and place at top of view
UIView *divider = [[UIView alloc] initWithFrame:CGRectMake(self.view.center.x ,0, 5, 70)];
divider.backgroundColor = [UIColor whiteColor];
[self.view addSubview:divider];
[self.view bringSubviewToFront:_car]; //Will make always as in front
//Animate the view moving towards the bottom
UIView * __weak weakDivider = divider;
[UIView animateWithDuration:3 animations:^{
CGRect newRect = CGRectMake(self.view.center.x, self.view.frame.size.height, 5, 70);
weakDivider.frame = newRect;
} completion:^(BOOL finished) {
}];
}
After you code the above lines, you could see your play world as belowCreate and animate opposite cars
Now you almost have a moving car on road. We can add some more interesting things by making it like real driving by adding some more cars which will move on the opposite direction. In viewDidLoad function I created one more NSTimer to create opposite cars. This will call the createcars function for every 2 seconds and move it with random speed.
//Create car and make animation
- (void)createCars{
float randNum = rand() % (10 - 2) + 2;
OppositeCar *oppoCar = [[OppositeCar alloc] initWithSpeed:randNum / 10];
oppoCar.delegate = self;
[_roadView addSubview:oppoCar];
[cars addObject:oppoCar]; //Holds all cars currently moving in visible area
}
OppositeCar is the custom class which overrides the UIImageView. In this class I have overridden the method initWithFrame and my business logic to alter the Car properties (Color, Speed)
- (id)initWithSpeed:(float)speed{
NSInteger time = round([[NSDate date] timeIntervalSince1970]);
int randPosition = rand() % 4;
time = round([[NSDate date] timeIntervalSince1970]);
int randColor = rand() % 4;
self = [super initWithFrame:CGRectMake(xPositions[randPosition], 0, width, height)];
self.contentMode = UIViewContentModeScaleAspectFit;
xPosition = xPositions[randPosition];
switch (randColor) {
case 0:
self = [super initWithImage:[UIImage imageNamed:@"greencar.png"]];
break;
case 1:
self = [super initWithImage:[UIImage imageNamed:@"redcar.png"]];
break;
case 2:
self = [super initWithImage:[UIImage imageNamed:@"yellowcar.png"]];
break;
case 3:
self = [super initWithImage:[UIImage imageNamed:@"bluecar.png"]];
break;
default:
break;
}
carSpeed = speed;
movingAnimator = [NSTimer scheduledTimerWithTimeInterval:speed/10
target:self
selector:@selector(moveCar)
userInfo:nil
repeats:YES];
return self;
}
Here, you may also see the NSTimer which calls the function moveCar at random time, based on its speed
//Move cars
- (void)moveCar{
[UIView animateWithDuration:(carSpeed/10) + .1
 animations:^{
CGRect oldRect = self.frame;
CGRect newRect = CGRectMake(xPosition, oldRect.origin.y + (10 * carSpeed) , width, height);
self.frame = newRect;
self.bounds = newRect;
UIViewController *rootView = [UIApplication sharedApplication].delegate.window.rootViewController;
if (newRect.origin.y > rootView.view.frame.size.height) {
[self.delegate onOutOfFocus:self];
[movingAnimator invalidate];
movingAnimator = nil;
}
} completion:^(BOOL finished) {
[self.delegate onAnimationEnds];
}];
}
Detect accidentAnd the class OppositeCar has two delegate methods- onOutOfFocus, onAnimationEnds.onOutOfFocus will be called when the car disappears from the visual area. You can increase the Score by One at this function.onAnimationEnds will be called after every small animations ends. You can detect the collision on this function.I have also implemented these delegate methods as below
#pragma marks - OppositeCar delegates
- (void)onAnimationEnds{
[self detectCollision];
}
//Detect the collision
- (void)detectCollision{
for (OppositeCar *car in cars) {
if (CGRectIntersectsRect(car.frame, _car.frame)) {
//Game Over
NSLog(@”Game Over”);
break;
}
}
}
- (void)onOutOfFocus:(OppositeCar *)car{
NSLog(@"Cars count %d", (int)[cars count]);
[cars removeObject:car];
score++;
_scoreLabel.text = [NSString stringWithFormat:@"%d",score];
}
Finally you get a game like this