Though you have your site launched online and ready to pull in sales, in order for a site to generate more sales, it would be needing a lot of traffic so that customers can view your products and buy them. The best was to drive in organic traffic to your website is using blog. Blogging in a very evident measure to bring in more visitors to your website and thereby drive in more sales. So what is the best blogging platform? It is obviously WordPress. The most widely used blogging platform in the world with millions of blog websites hosted with WordPress.
We are going to integrate these 2 powerful and successful platform to leverage the benefits that these provides. Hosting your blog site with WordPress has got a lot of benefits with SEO but only thing is that we need to be cautious about the security parameters of the WordPress site. To be short and sweet, Fishpig Magento WordPress integration plugin is the key to integrate Magento 2 with WordPress. Fishpig WordPress Integration extension was available for Magento 1 for a very long time and has been very useful for integrating Magento 1 sites with WordPress. I have personally used this plugin for various Magento sites integration with WP. Now the good news is that Fishpig has released this free plugin for Magento 2 also.
Lets go through the step by step process of integrating Magento 2 website with WordPress.
The first step is to install WordPress:
Install WordPress:
- Open up WordPress Official website and download the most latest version of WordPress.
- Unzip the file in your local machine. This would create a folder called as “WordPress” and all the WordPress related files would be present in it.
- Rename the folder “WordPress” to “blog”.
- Upload the “blog” folder to the root directory of your Magento installation such that it can be accessed from the browser with the following URL: https://example.com/blog/
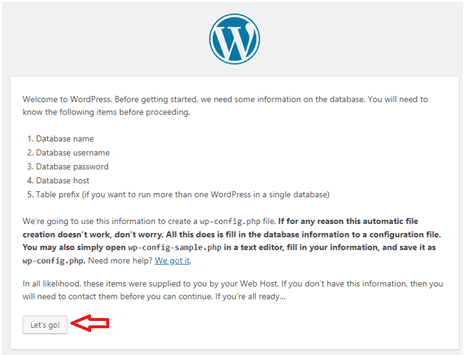
- Open the web browser and access the website url followed by the blog folder. This would open up the WordPress installation page.
- Just click on the “Let’s go!” button.
- Fill in the database details. Here make sure you provide the DB details of the Magento website that you have setup already.
- You can get the Magento 2 site DB details from the file app/etc/env.php.
- Click on the Submit button once you have provided the database details.

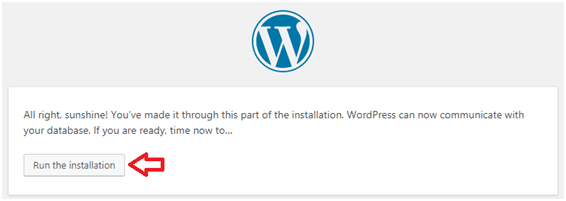
- If you end up with an error stating that WordPress is not able to write the file wp-config.php, then just create the file wp-config.php and copy paste the code that appears on the screen and save it. Click on “Run the install” button.
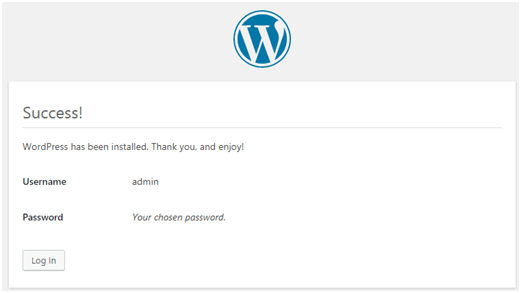
- Next page would be the welcome page where you can enter the Site title and admin panel details like username and password.
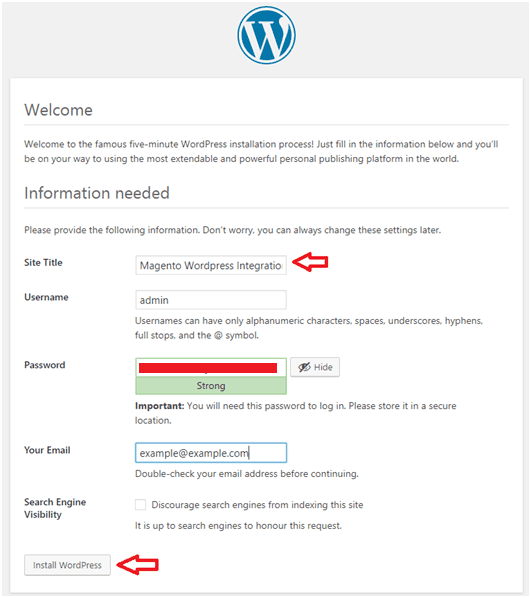
- Once you have provided these details, click on the Install WordPress button. This would install WordPress and after successful installation, success page would be displayed.
Are You Ready To Start Your Tech Journey With Our WordPress and Magento Developers?
Now that you have WordPress installed, next is to install the FishPig extension that integrates WordPress with Magento 2.
Install FishPig Magento 2 WordPress Integration Extension:
- Go to the FishPig official website and download the extension.
- This would download a ZIP file. Unzip the file and it would create many files and folders. Create a new folder and name it “WordPress”. Move all these files and folders into the folder “WordPress”.
- Now upload this WordPress folder to the following directory in Magento: app/code/FishPig/. If you are working on a fresh Magento Installation, you will have to create the “code” folder inside the “app” folder. Also create the “FishPig” folder inside the “code” folder. Make sure you specify the letter capitalizations also properly as shown here since its very important. Once you have uploaded the WordPress folder, this is how the folder structure would be: app/code/FishPig/WordPress/.
- Now execute the following commands in sequence:
- php bin/magento module:enable FishPig_WordPress
- php bin/magento setup:upgrade
- php bin/magento setup:di:compile
- php bin/magento cache:clean
- php bin/magento cache:flush
- Login to the Magento admin Panel and click on the WORDPRESS menu item on the left. Make sure the module is enabled and specify the path as “blog” as shown in the below screenshot:

- Once you have made the necessary changes, just click on the “Save Config” button.
Configuration Changes in WordPress:
- Login to WordPress Admin Panel.
- Navigate to Settings -> General. Make sure the Site Address (URL) is what you want your Blog site URL to be and click on the Save Changes button.

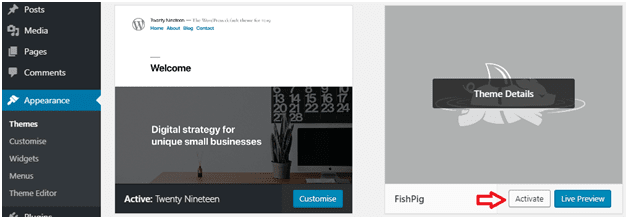
- Now go to Appearance -> Themes.
- Activate the FishPig theme by clicking on the Activate button.
That’s it!! Now open up your blog page and you would start to see the WordPress blog design to be similar to your Magento default theme. Have any doubts or queries, Contact Us we are ready to assist you.